Short answer: Scanventory does not need a special WooCommerce label printer. It builds QR code labels in your WordPress admin and opens them in a new browser tab for printing. Use a ready-made Avery-compatible sheet, or set Label Format to Universal and enter page size, margins, gaps and label size in millimetres so the layout matches your sheet stock or thermal roll. Always print at 100% scale (no "fit to page"), then use Calibration scale if a test print is slightly off (Universal Options).
A label printer only helps if the layout matches the paper. Here's how to pick the right hardware and set Scanventory so QR code labels land where they should.
What Scanventory actually prints
Each label carries the product name, SKU and a unique QR code (Scanventory). Staff scan that QR code with a phone or tablet to open the product and edit stock. Scanventory prints QR codes only — not EAN, UPC or other retail barcodes (Scanventory FAQ).
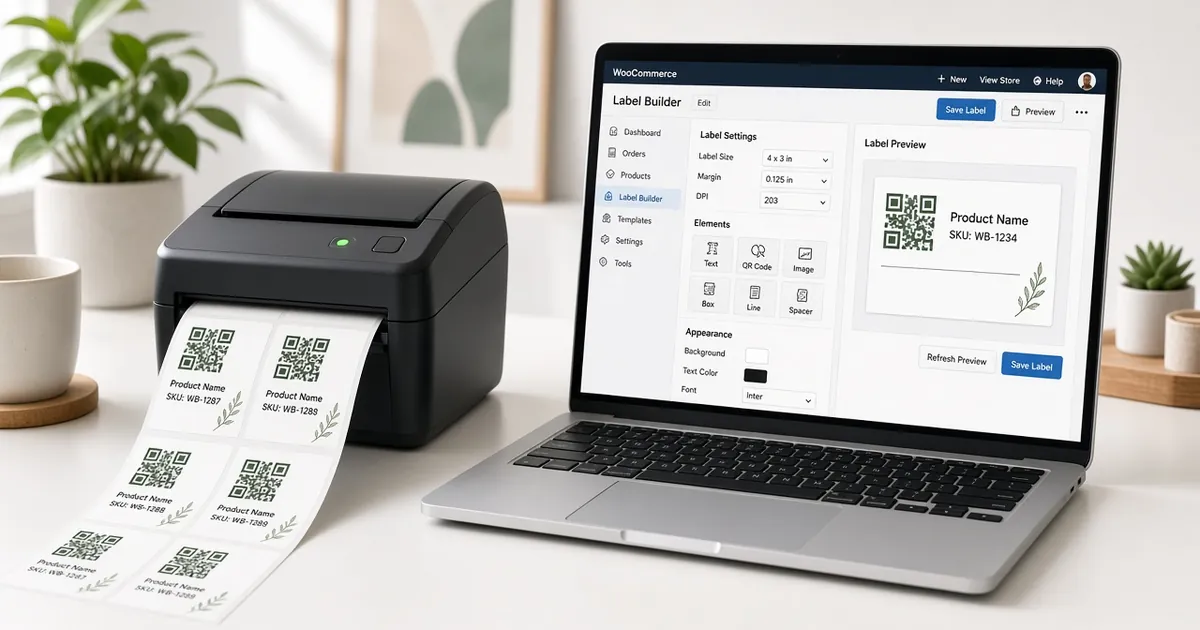
Printing happens from the Label Builder: configure the layout, check the Live Preview, click Build Labels, and print from the new browser tab (Label Builder). There is no separate printer driver inside the plugin. Your computer's normal print dialog talks to the printer.
Sheet printer or thermal roll?
Two common setups both work, as long as you match the layout:
| Setup | Typical stock | Scanventory route | |---|---|---| | Office laser or inkjet | Avery-compatible sheets (many labels per page) | Avery-compatible preset, or Universal | | Thermal label printer | Continuous roll or die-cut labels | Universal (homepage: roll printer support) |
The homepage states that the Label Builder supports partial sheets (start offset) and roll printers (Scanventory, FAQ). The documentation describes Universal as configurable for any printer or page size, with panels that appear so you can match any label stock or thermal printer (Label Format, Universal Options).
If you already buy Avery sheets, start with the Avery labels for WooCommerce guide. This post focuses on choosing a printer and dialling in Universal — especially for rolls.
Before you buy a label printer
You do not need warehouse hardware. Scanventory is built so any phone that can scan QR codes is the scanner (Scanventory). For the printer side, check:
- Label size in millimetres. Universal uses mm for page width/height, margins, gaps and the size of one label (Universal Options). Measure a sample label before you order a box of stock.
- How the printer feeds. Sheet printers take A4 or Letter. Thermal printers often take a roll; you still set page width/height to the printable area of one label (or one row) so the browser page matches the roll.
- Browser printing. Labels open in a browser tab. Confirm your printer works with Chrome, Firefox, Edge or Safari print dialogs on the computer that runs WordPress admin (or the machine you print from).
- Dark text on light labels. QR codes need enough contrast. Prefer black-on-white thermal or toner stock over light grey on coloured labels.
You do not need a barcode scanner gun. Phones handle scanning; the printer only produces the stickers.
Step 1: Open Label Builder and pick Universal
In WordPress admin, open Scanventory. The Label Builder shows configuration cards on the left and a Live Preview on the right (Label Builder).
- For standard office sheets, try an Avery-compatible Label Format first.
- For a thermal roll, custom die-cut stock, or any sheet the presets don't match, set Label Format to Universal.
Under Universal you can load a Preset (for example A4 3×8) or choose Custom, then edit page size, margins, grid and label size yourself (Universal Options).
Step 2: Enter the layout that matches your stock
For Universal, fill in the panels that match your physical labels (Universal Options):
- Page size — named paper (A4, Letter, …) or exact page width / height in mm. For many thermal printers, set width and height to one label's printable area.
- Margins — top, right, bottom, left from the page edge to the label grid. Match the printer's non-printable area.
- Gaps — horizontal (X) and vertical (Y) space between labels in mm. On a single-label roll, gaps are often 0.
- Grid — columns and rows on one page. A one-up roll is typically 1×1.
- Label size — width and height of one label cell in mm.
- QR code size in mm so the code fits inside the safe area.
- Fonts — name size and body text size in points if you need larger type on small labels.
Watch the Live Preview as you change values. Use Zoom and Fit to inspect the sheet; Template / page info shows the active format and page dimensions (Live Preview).
Step 3: Print a test at 100% scale
Click Build Labels. In the browser and printer dialogs:
- Set scaling to 100%.
- Turn off fit to page / shrink to fit.
The documentation is explicit: always print with browser and printer scaling at 100% (Universal Options).
Print one test on spare stock (or plain paper held against a sample label). If everything is slightly too large or too small, adjust Calibration scale in small steps — 1 means 100% (Universal Options). If content sits too close to the cut edge, increase Safe area. If you are reprinting on a partly used sheet, set Start position to the first free row and column (Universal Options).
Write down the settings that worked for that roll or box so the next run matches.
Try Scanventory in your store
Print QR code labels from your WooCommerce admin and update stock from your phone.
Buy on WooCommerce.com$159/year · 30-day money-back guaranteeSheet vs roll: which should you use?
- Avery / office sheets: cheapest path if you already have a laser or inkjet. Good for labelling a full catalog in one session. See Avery label sheets for WooCommerce.
- Thermal roll: faster for one-off labels and new stock, less waste when you only need a few stickers, and the homepage lists roll printer support for that workflow (Scanventory).
- Mix both: many shops print bulk runs on sheets and keep a small thermal printer at the packing bench for new SKUs.
Either way, pick products with All Products or select some in Products → All Products and use Bulk actions → Build labels (Specific Product Labels). For sizes and colours, turn on Label For Variations so each variation gets its own QR code label (Label Builder).
Common questions
Does Scanventory work with thermal label printers?
Yes. Universal is described as matching any label stock or thermal printer, and the homepage lists roll printer support (Universal Options, Scanventory). You configure page size and label size in millimetres, then print from the browser at 100% scale.
Do I need a special WooCommerce label printer?
No. Scanventory prints through the browser. Any printer your computer can already use — sheet or roll — works if the Universal (or Avery) layout matches the stock.
Can I print EAN or UPC barcodes?
No. Scanventory prints QR codes on its labels. Each product gets its own QR code for scanning and stock edits (Scanventory FAQ).
Why are my labels the wrong size?
Almost always scaling. Set the print dialog to 100% and disable fit-to-page, then nudge Calibration scale if needed (Universal Options). Also confirm page width/height and label size in mm match the physical stock.
Can I finish a partly used sheet?
Yes. Set Start position to the first free row and column before you click Build Labels (Universal Options).
Put the right printer to work
A WooCommerce label printer setup is really a layout problem: match millimetres in Universal to the stock in the tray or on the roll, print at 100%, and calibrate once. Scanventory then gives you QR code labels, phone scanning and stock updates in one plugin. Buy Scanventory and print your first test sheet today.